DE - Quick Start & Warnings
Step 1
Step 2
Step 3
Step 4
WARNINGS
Step 1

Wachs erwärmen
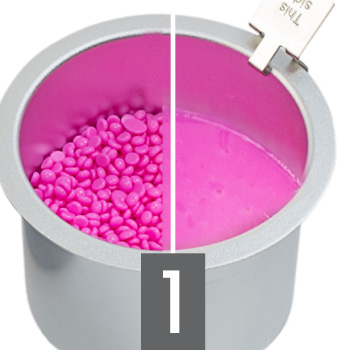
Die Wachsperlen in den Wachserhitzer einfüllen bis dieser mindestens zu 1/3 gefüllt ist und das Wachs eine honigartige Konsistenz hat. Die richtige Temperatur erkennt man daran, dass das Wachs sich leicht an der Spatelspitze formen lässt, nicht vom Spatel tropft und keine Fäden zieht.Step 2

Haut vorbehandeln
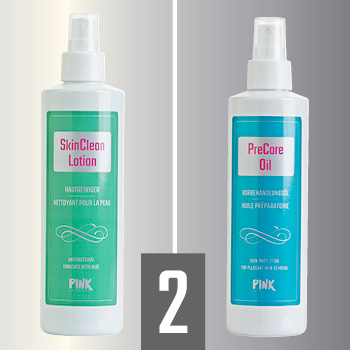
Die Haut mit etwas PINK SkinClean Lotion reinigen und anschließend PINK PreCare Oil auftragen. Das Öl bildet einen dünnen Schutzfilm zwischen Wachs und Haut – dies hat weniger Hautirritationen zur Folge. Die Haut bei Bedarf mit einem Kosmetiktuch trocken tupfen.Step 3

Wachs auftragen & abnehmen
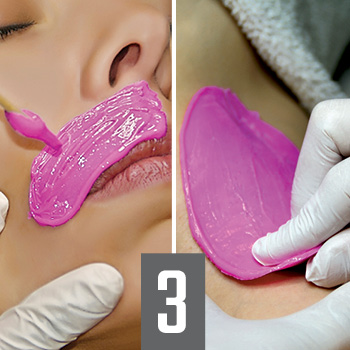
Next Generation Wachse können sowohl gegen als auch in Haarwuchsrichtung aufgetragen werden. Kurz warten, bis die Wachs-Patches fest geworden sind und dann gegen die Haarwuchsrichtung abziehen. Die Patches bleiben auf der Haut sehr lange flexibel und brechen nicht.Step 4

Haut nachbehandeln
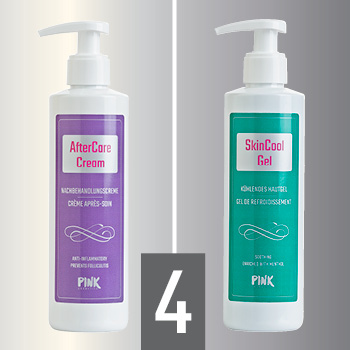
Etwas PINK AfterCare Cream auftragen, um die Haut zu desinfizieren, intensiv mit Feuchtigkeit zu versorgen, zu beruhigen und die Haarfollikel beim Schließen zu unterstützen. Behandlung mit PINK SkinCool Gel abschließen, um Rötungen zu reduzieren und der Haut ein frisches und entspanntes Gefühl zu verleihen.WARNINGS
Beschriftete Warnhinweise und Gebrauchsanweisungen
- Achten Sie darauf, dass das Wachs die Haut nicht verbrennt;
- Nur für äußere Anwendung;
- Außerhalb der Reichweite von Kindern aufbewahren;
- Den Kontakt mit den Augen vermeiden;
- Nicht in Ohren oder Nase verwenden;
- Nicht auf Krampfadern, Muttermalen, verletzter, gereizter oder sonnenverbrannter Haut anwenden;
- Personen mit Diabetes, Kreislaufproblemen, Personen, die orale Retinoide einnehmen, oder ältere Menschen sollten dieses Produkt nicht verwenden;
- Wenn ein Benutzer bekanntermaßen besonders empfindlich ist, wird empfohlen, vor der Anwendung einen Epikutantest auf einer kleinen Hautstelle durchzuführen und 24 bis 48 Stunden zu warten. Wenn Hautreizungen auftreten, stellen Sie die Anwendung ein;
- Waxing ist für Schwangere geeignet, kann aber Blutergüsse verursachen;
- Anwendungsfläche nach Gebrauch gründlich abspülen.
- Es ist normal, dass die Haut nach dem Waxing rot wird. Bei Beschwerden, Brennen oder Blutergüssen eine kalte Kompresse auf die Haut auftragen. Die Symptome sollten innerhalb von 24 Stunden verschwinden. Wenn nicht, ärztlichen Rat einholen;
- Setzen Sie die behandelte Haut 24 Stunden nach der Anwendung nicht direktem Sonnenlicht, Wärmebehandlungen, künstlichen Bräunungsgeräten oder parfümierten Produkten aus;

NL - Quick Start & Warnings
Step 1
Step 2
Step 3
Step 4
WARNINGS
Step 1

Wax verwarmen
Vul de waxparels in de wax heater tot deze voor minimaal 1/3 vol is en de wax een honingachtige consistentie heeft. De juiste temperatuur is te herkennen aan het feit dat de wax zich gemakkelijk laat vormen aan de punt van de spatel, niet uit de spatel druipt en geen draadjes trekt.Step 2

Huid voorbehandelen
Reinig de huid met een beetje PINK SkinClean Lotion en breng daarna PINK PreCare Oil aan. De olie vormt een dunne beschermende film tussen de wax en de huid – dit resulteert in minder huidirritatie. Dep de huid indien nodig droog met een tissue.Step 3

Wax aanbrengen en verwijderen
Next Generation Wax kan zowel tegen als in de richting van de haargroei worden aangebracht. Wacht even tot de waxstroken zijn uitgehard en trek deze dan tegen de haargroeirichting in eraf. De stroken blijven zeer lang flexibel op de huid en breken niet.Step 4

Huid nabehandelen
Breng wat PINK AfterCare Cream aan om de huid te desinfecteren, intensief te hydrateren, te kalmeren en de haarzakjes te helpen sluiten. Rond de behandeling af met PINK SkinCool Gel om roodheid te verminderen en de huid fris en ontspannen te laten aanvoelen.WARNINGS
Gelabelde waarschuwingen en gebruiksaanwijzingen
- Zorg ervoor dat wax de huid niet verbrandt;
- Alleen voor uitwendig gebruik;
- Buiten bereik van kinderen houden;
- Vermijd contact met de ogen;
- Niet in oren of neus gebruiken;
- Niet gebruiken op spataderen, moedervlekken, kapotte, geïrriteerde of door de zon verbrande huid;
- Mensen met diabetes, problemen met de bloedsomloop, mensen die orale retinoïden gebruiken of ouderen mogen dit product niet gebruiken;
- Als bekend is dat een gebruiker bijzonder gevoelig is, wordt aanbevolen om voor gebruik een pleistertest uit te voeren op een klein deel van de huid en 24 tot 48 uur te wachten. Als huidirritatie optreedt, stop dan met het gebruik;
- Harsen is geschikt voor zwangere vrouwen, maar kan blauwe plekken veroorzaken;
- Na gebruik het oppervlak van de applicatie grondig afspoelen.
- Het is normaal dat de huid rood wordt na het harsen. Als ongemak of een branderig gevoel wordt ervaren, of als er blauwe plekken zijn, breng dan een koud kompres aan op de huid. De symptomen zouden binnen 24 uur moeten verdwijnen. Als dit niet het geval is, zoek dan medisch advies;
- Stel de behandelde huid gedurende 24 uur na gebruik niet bloot aan direct zonlicht, warmtebehandelingen, kunstmatige bruiningsapparatuur of geparfumeerde producten;

EN - Quick Start & Warnings
Step 1
Step 2
Step 3
Step 4
WARNINGS
Step 1

Heating Wax
Fill the wax beads into the wax heater until it is at least 1/3 full and the wax has a honey-like consistency. The correct temperature can be recognized by the fact that the wax forms easily at the tip of the spatula, does not drip from the spatula and does not pull threads.
Step 2

Skin preparation
Cleanse the skin with a little PINK SkinClean Lotion and then apply PINK PreCare Oil. The oil forms a thin protective film between the wax and the skin – resulting in less skin irritation. Pat the skin dry with a tissue if necessary.Step 3

Application and removal
Next Generation Wax can be applied both against and in the direction of hair growth. Wait a moment for the wax strips to set and then pull them off against the direction of hair growth. The strips remain flexible on the skin for a very long time and do not break.Step 4

Skin After-Care
Apply some PINK AfterCare Cream to disinfect the skin, intensively moisturize, soothe and help close the hair follicles. Complete the treatment with PINK SkinCool Gel to reduce redness and leave skin feeling fresh and relaxed.WARNINGS
Labelled warnings and instructions of use
- Take care to ensure wax will not burn skin;
- For external use only;
- Keep out of reach of children;
- Avoid contact with eyes;
- Do not use inside ears or nose;
- Do not use on varicose veins, moles, broken, irritated or sunburnt skin;
- People with diabetes, circulatory problems, people taking oral retinoids, or the elderly should not use this product;
- If a user is known to be particularly sensitive, it is recommended to do a patch test on a small area of skin before use and waiting for 24 to 48 hours. If skin irritation develops, discontinue use;
- Waxing is suitable for pregnant women, but may cause bruising;
- Thoroughly rinse surface of application after use.
- It is normal for skin to turn red after waxing. If discomfort or a burning sensation is experienced, or if there is bruising, apply a cold compress to the skin. Symptoms should disappear within 24 hours. If not, seek medical advice;
- Do not expose the treated skin to direct sunlight, heat treatments, artificial tanning equipment, or fragranced products for 24 hours after use;

FR - Quick Start & Warnings
Step 1
Step 2
Step 3
Step 4
WARNINGS
Step 1

Cire chauffante
Remplissez les perles de cire dans le chauffe-cire jusqu’à ce qu’il soit au moins 1/3 plein et que la cire ait une consistance semblable à celle du miel. La température correcte peut être reconnue par le fait que la cire se forme facilement à la pointe de la spatule, ne coule pas de la spatule et ne tire pas les fils.Step 2

Préparation de la peau
Nettoyez la peau avec un peu de PINK SkinClean Lotion puis appliquez PINK PreCare Oil. L’huile forme un mince film protecteur entre la cire et la peau, ce qui réduit les irritations cutanées. Séchez la peau avec un mouchoir si nécessaire.Step 3

Application et suppression
La cire de nouvelle génération peut être appliquée à la fois contre et dans le sens de la croissance des cheveux. Attendez un moment que les bandes de cire se fixent, puis retirez-les dans le sens contraire à la pousse des poils. Les bandes restent souples sur la peau très longtemps et ne se cassent pas.Step 4

Soins de la peau
Appliquez un peu de PINK AfterCare Cream pour désinfecter la peau, hydrater intensément, apaiser et aider à refermer les follicules pileux. Complétez le traitement avec PINK SkinCool Gel pour réduire les rougeurs et laisser la peau fraîche et détendue.WARNINGS
Avertissements étiquetés et instructions d’utilisation
- Assurez-vous que la cire ne brûle pas la peau;
- Seulement pour usage externe;
- Tenir hors de portée des enfants;
- Éviter le contact visuel;
- Ne pas utiliser à l’intérieur des oreilles ou du nez;
- Ne pas utiliser sur les varices, les grains de beauté, la peau cassée, irritée ou brûlée par le soleil;
- Les personnes atteintes de diabète, de problèmes circulatoires, les personnes prenant des rétinoïdes oraux ou les personnes âgées ne doivent pas utiliser ce produit.
- Si un utilisateur est connu pour être particulièrement sensible, il est recommandé de faire un patch test sur une petite surface de peau avant utilisation et d’attendre 24 à 48 heures. Si une irritation cutanée se développe, cesser l’utilisation;
- L’épilation à la cire convient aux femmes enceintes, mais peut provoquer des ecchymoses; Bien rincer la surface d’application après utilisation.
- Il est normal que la peau devienne rouge après l’épilation. En cas d’inconfort ou de sensation de brûlure, ou s’il y a des ecchymoses, appliquez une compresse froide sur la peau. Les symptômes devraient disparaître dans les 24 heures. Si ce n’est pas le cas, consultez un médecin;
- Ne pas exposer la peau traitée à la lumière directe du soleil, aux traitements thermiques, aux appareils de bronzage artificiel ou aux produits parfumés pendant 24 heures après utilisation.

ES - Quick Start & Warnings
Step 1
Step 2
Step 3
Step 4
WARNINGS
Step 1

Cera de calentamiento
Rellene las cuentas de cera en el calentador de cera hasta que esté al menos 1/3 lleno y la cera tenga una consistencia similar a la miel. La temperatura correcta se puede reconocer por el hecho de que la cera se forma fácilmente en la punta de la espátula, no gotea de la espátula y no tira hilos.Step 2

Preparación de la piel
Limpiar la piel con un poco de PINK SkinClean Lotion y luego aplicar PINK PreCare Oil. El aceite forma una fina película protectora entre la cera y la piel, lo que reduce la irritación de la piel. Seque la piel con un pañuelo si es necesario.Step 3

Aplicación y eliminación
Next Generation Wax se puede aplicar tanto en dirección contraria como en la dirección del crecimiento del vello. Espere un momento a que las tiras de cera se asienten y luego retírelas en dirección contraria al crecimiento del vello. Las tiras permanecen flexibles sobre la piel durante mucho tiempo y no se rompen.Step 4

Cuidado posterior de la piel
Aplicar un poco de PINK AfterCare Cream para desinfectar la piel, hidratar intensamente, calmar y ayudar a cerrar los folículos pilosos. Complete el tratamiento con PINK SkinCool Gel para reducir el enrojecimiento y dejar la piel fresca y relajada.WARNINGS
Advertencias e instrucciones de uso etiquetadas
- Tenga cuidado de asegurarse de que la cera no queme la piel;
- Sólo para uso externo;
- Mantener fuera del alcance de los niños;
- Evitar contacto visual;
- No lo use dentro de los oídos o la nariz;
- No lo use en venas varicosas, lunares, piel agrietada, irritada o quemada por el sol;
- Las personas con diabetes, problemas circulatorios, personas que toman retinoides orales o ancianos no deben usar este producto;
- Si se sabe que un usuario es particularmente sensible, se recomienda hacer una prueba de parche en un área pequeña de la piel antes de usarlo y esperar de 24 a 48 horas. Si se desarrolla irritación de la piel, suspenda el uso;
- La depilación con cera es adecuada para mujeres embarazadas, pero puede causar hematomas;
Enjuague bien la superficie de aplicación después de su uso. - Es normal que la piel se ponga roja después de la depilación. Si experimenta molestias o sensación de ardor, o si hay hematomas, aplique una compresa fría sobre la piel. Los síntomas deben desaparecer en 24 horas. Si no, busque consejo médico;
- No exponga la piel tratada a la luz solar directa, tratamientos térmicos, equipos de bronceado artificial o productos perfumados durante las 24 horas posteriores al uso;

IT - Quick Start & Warnings
Step 1
Step 2
Step 3
Step 4
WARNINGS
Step 1

Cera riscaldante
Riempi le perline di cera nello scaldacera fino a quando non è pieno per almeno 1/3 e la cera ha una consistenza simile al miele. La corretta temperatura si riconosce dal fatto che la cera si forma facilmente sulla punta della spatola, non gocciola dalla spatola e non tira i fili.Step 2

Preparazione della pelle
Detergi la pelle con un po‘ di PINK SkinClean Lotion e poi applica PINK PreCare Oil. L’olio forma una sottile pellicola protettiva tra la cera e la pelle, con conseguente minore irritazione della pelle. Tampona la pelle con un fazzoletto, se necessario.Step 3

Applicazione e rimozione
Next Generation Wax può essere applicato sia contro che nella direzione della crescita dei capelli. Aspetta un momento che le strisce di cera si stabilizzino e poi toglile contro la direzione della crescita dei peli. Le strisce rimangono flessibili sulla pelle per molto tempo e non si rompono.Step 4

Dopo la cura della pelle
Applicare un po‘ di PINK AfterCare Cream per disinfettare la pelle, idratare intensamente, lenire e aiutare a chiudere i follicoli piliferi. Completa il trattamento con PINK SkinCool Gel per ridurre i rossori e lasciare la pelle fresca e rilassata.WARNINGS
Avvertenze etichettate e istruzioni per l’uso
- Assicurati che la cera non bruci la pelle;
- Solo per uso esterno;
- Tenere fuori dalla portata dei bambini;
- Evitare il contatto con gli occhi;
- Non utilizzare all’interno delle orecchie o del naso;
- Non utilizzare su vene varicose, nei, pelle lesa, irritata o scottata dal sole;
- Le persone con diabete, problemi circolatori, persone che assumono retinoidi orali o anziani non devono usare questo prodotto;
- Se un utente è noto per essere particolarmente sensibile, si consiglia di eseguire un patch test su una piccola area della pelle prima dell’uso e di attendere dalle 24 alle 48 ore. Se si sviluppa irritazione cutanea, interrompere l’uso;
- La ceretta è adatta alle donne in gravidanza, ma può causare lividi;
- Sciacquare accuratamente la superficie di applicazione dopo l’uso.
- È normale che la pelle diventi rossa dopo la ceretta. Se si avverte disagio o sensazione di bruciore, o se sono presenti lividi, applicare un impacco freddo sulla pelle. I sintomi dovrebbero scomparire entro 24 ore. In caso contrario, consultare un medico;
- Non esporre la pelle trattata alla luce solare diretta, a trattamenti termici, apparecchiature abbronzanti artificiali o prodotti profumati per 24 ore dopo l’uso.


